이 단원에서는 그림을 그리는 방법을 알아본다.
그림을 그리기 위해서는 다음과 같은 구조체들이 필요하다.
|
1
2
3
4
5
6
|
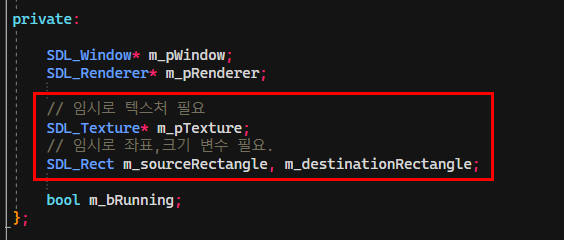
SDL_Window* m_pWindow;
SDL_Renderer* m_pRenderer;
SDL_Texture* m_pTexture; // the new SDL_Texture variable, 텍스처 변수
SDL_Rect m_sourceRectangle; // the first rectangle, 그림의 그리고자하는 그림의 본 좌표,크기
SDL_Rect m_destinationRectangle; // another rectangle, 그림이 그려지는 좌표, 크기
|
cs |
물론, 그림을 그리기위해선 그림파일이 필요하다
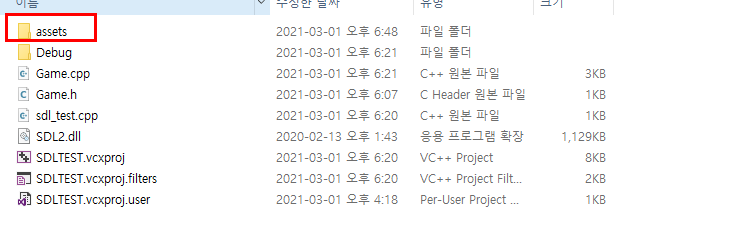
여기에서는 assets 폴더를 만들고 그림을 넣겠다.
그림파일 이름은 "enemy.png" 로 하겠다.
코딩을 시작하기 전에 SDL에서 사용하는 SDL_LoadBMP() 함수를 이용한 방법은 제외하겠다.
게임에서는 BMP를 사용하는 일이 이제는 거의 없고 PNG를 사용하기 때문에 제외하였다.
코딩은 저번 단원을 이어서 시작한다. -> gamdekong.tistory.com/172?category=982747
Game.h 에 다음을 추가한다.
Game.cpp 에 Init 함수와 Render 함수에 다음과 같이 추가한다.
Init 함수
|
1
2
3
4
5
6
7
8
9
10
11
12
13
14
15
16
17
18
19
20
21
22
23
24
25
26
27
28
29
30
31
32
33
34
35
36
37
38
39
40
41
42
43
44
45
46
47
48
49
50
51
52
53
54
55
56
57
58
59
60
61
62
63
64
65
66
67
68
69
70
|
bool Game::Init(const char* parTitle, int parXPos, int parYpos, int parWidth, int parHeight, int parFlags)
{
// attempt to initialize SDL
if (SDL_Init(SDL_INIT_EVERYTHING) == 0)
{
std::cout << "SDL init success\n";
// init the window
m_pWindow = SDL_CreateWindow(parTitle, parXPos, parYpos,
parWidth, parHeight, parFlags);
if (m_pWindow != 0) // window init success
{
std::cout << "window creation success\n";
m_pRenderer = SDL_CreateRenderer(m_pWindow, -1, 0);
if (m_pRenderer != 0) // renderer init success
{
std::cout << "renderer creation success\n";
// 파란색 화면.
SDL_SetRenderDrawColor(m_pRenderer, 0, 0, 255, 255);
}
else
{
std::cout << "renderer init fail\n";
return false; // renderer init fail
}
}
else
{
std::cout << "window init fail\n";
return false; // window init fail
}
}
else
{
std::cout << "SDL init fail\n";
return false; // SDL init fail
}
std::cout << "init success\n";
m_bRunning = true; // everything inited successfully, start the main loop
/////////////////////////////////////////////////////////////////////////////////////////////
// 테스트를 위해서 임의로 init에서 그림을 생성하겠다.
// surface 생성
SDL_Surface* pTempSurface = IMG_Load("assets/enemy.png");
// surface를 이용해 texture 생성
m_pTexture = SDL_CreateTextureFromSurface(m_pRenderer, pTempSurface);
// 사용한 surface 해제
SDL_FreeSurface(pTempSurface);
// 이제는 Texture를 이용해 그림을 그릴 준비가 끝났다.
// 우리가 로드한 텍스처에서 그림의 크기를 가져온다.
SDL_QueryTexture(m_pTexture, NULL, NULL, &m_sourceRectangle.w, &m_sourceRectangle.h);
// 그림이 뿌려질 x,y좌표를 0으로 설정한다.
m_destinationRectangle.x = m_sourceRectangle.x = 0;
m_destinationRectangle.y = m_sourceRectangle.y = 0;
// 본래 그림의 width, height 를 뿌려질 크기로 똑같이 설정.
m_destinationRectangle.w = m_sourceRectangle.w;
m_destinationRectangle.h = m_sourceRectangle.h;
/////////////////////////////////////////////////////////////////////////////////////////////
return true;
}
|
cs |
Render 함수
|
1
2
3
4
5
6
7
8
9
10
11
|
void Game::Render()
{
SDL_RenderClear(m_pRenderer); // clear the renderer to the draw color
// RenderClear 와 RenderPresent 사이에 렌더링 할 부분을 넣는다.
////////////////////////////////////////////////////////////////////////////////////////
SDL_RenderCopy(m_pRenderer, m_pTexture, &m_sourceRectangle, &m_destinationRectangle);
////////////////////////////////////////////////////////////////////////////////////////
SDL_RenderPresent(m_pRenderer); // draw to the screen
}
|
cs |
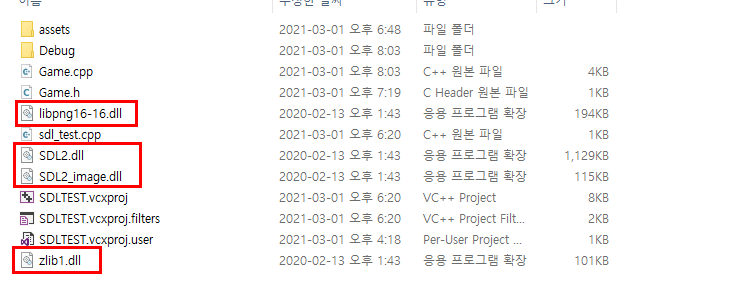
실행하기 위해선 다음의 dll파일이 필요하다. 라이브러리에 있다.
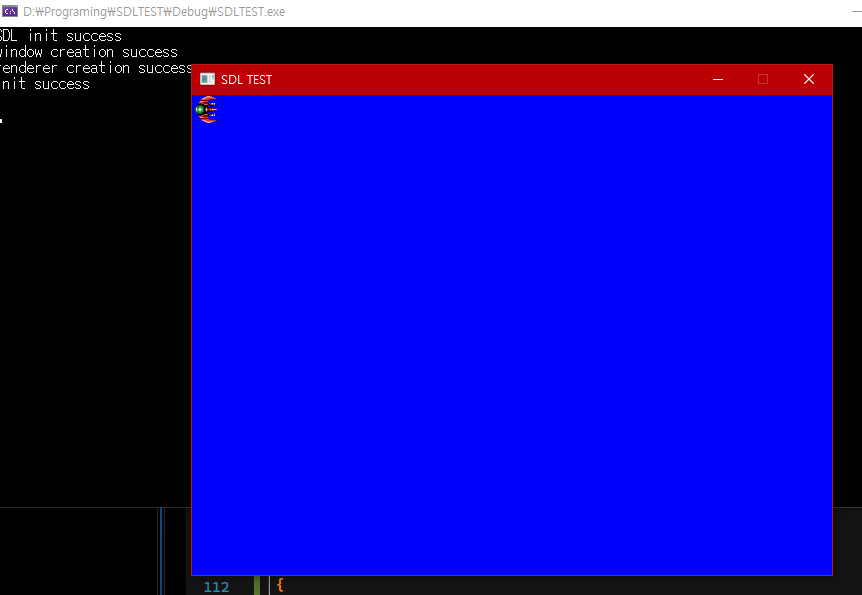
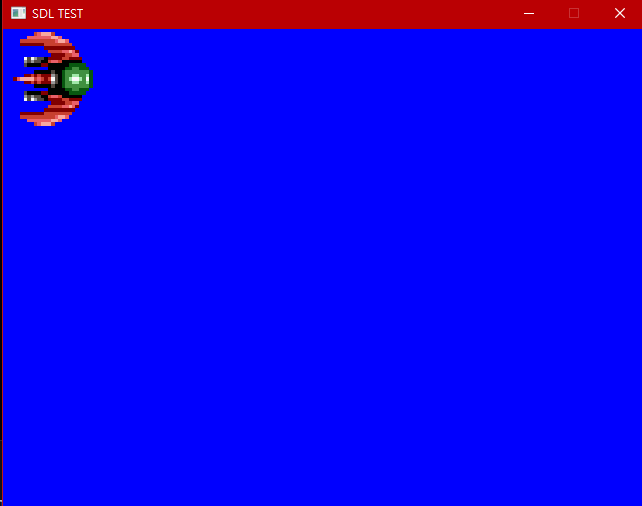
실행하면 다음과 같은 결과를 얻을 수 있다.
그림의 좌표와 크기를 변경해보자.
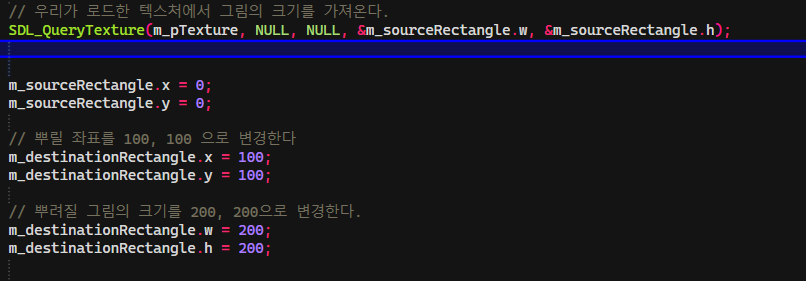
위와 같이 변경했을때 결과는 다음과 같다.

SourceRectangle 변경하면 다음과 같다
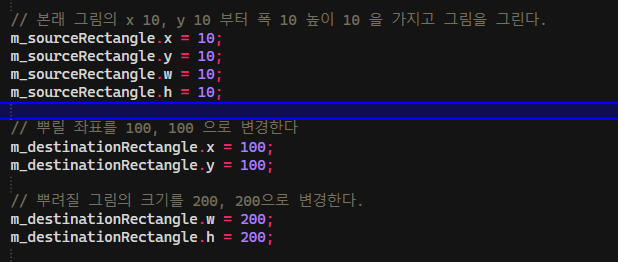
위와같이 변경하면 결과는 다음과 같다.

마지막으로 다음 함수를 이용하여 그림을 Flip 시킬 수 있다.
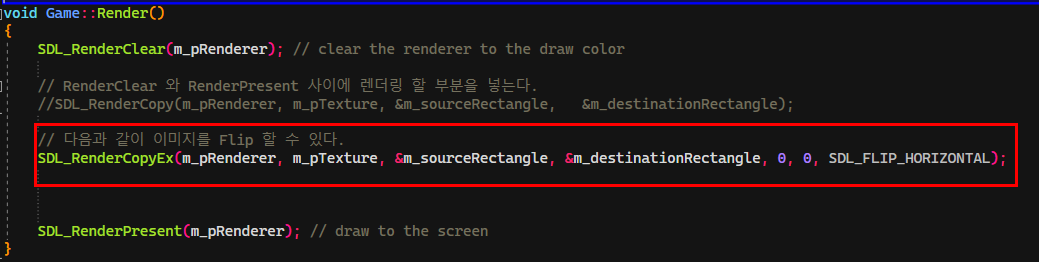
결과는 다음과 같다.
Flip Flag는 다음과 같다

출처: SDL Game Development, Shaun Ross Mitchell
'C++ > SDL' 카테고리의 다른 글
| 4. SDL TextureManager 만들기(Singleton, 이미지 그리기) (0) | 2021.03.03 |
|---|---|
| 2. SDL Init의 함수화 및 클래스화 (0) | 2021.03.01 |
| 1. Hello SDL (SDL 초기화) (0) | 2021.03.01 |